Looking after the environment is an important issue, but many undervalue how simple, small changes can have positive knock-on effects. Environmental labels, for example, are a key method of reducing waste in communities and businesses.
Littering, landfills and the state of our communities are of course mostly helped by strategies and technology. However, the impact of a simple label can pay dividends when it comes to making people and employees aware.
Here, we break down how environmental labels play a role in waste-reduction strategies.
The Impact of Environmental Labels
As a business owner, it is your responsibility to limit the environmental impact of your company. Not only is it enforced by legislation, but if you work with public entities, they often ask for evidence and examples that your business contributes to looking after the environment.
The yardstick that measures the environmental credentials of a business is ISO 14001. This international standard ensures a business has a sufficient environmental management system.
As part of this compliance, businesses are expected to do all they can to minimise impact while using labels to present information in a way that facilitates this.
Types of Environmental Labels
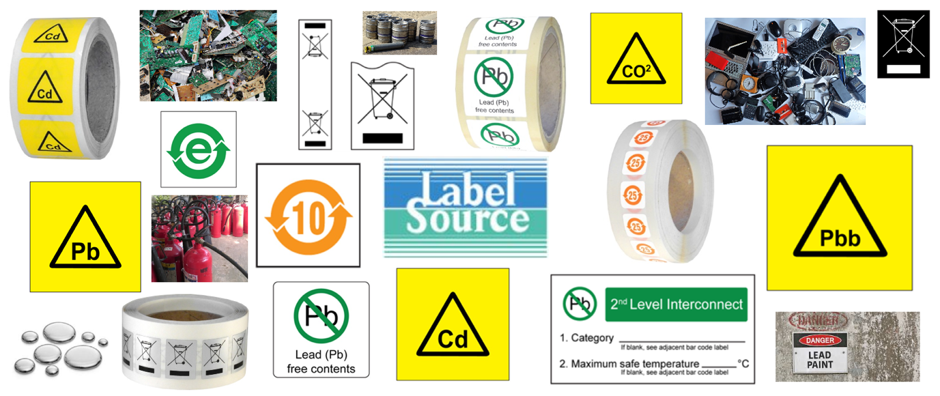
At Label Source, we stock labels that comply with and focus around both RoHS (Restriction of Hazardous Substances Directive) and WEEE (Waste Electrical and Electronic Equipment Directive). These labels ensure hazardous electrical and chemical waste is safely disposed of.
RoHS prevents the use of certain hazardous substances in consumer goods. Our labels help people identify the presence of these substances or their absence. In total, these substances include:
- Bismuth
- Cadmium
- Carbon Dioxide
- Chrome
- Lead
- Mercury
- Polybrominated Diphenyl Ether
- Polybrominated Biphenyl
WEEE, on the other hand, focuses solely on electronic waste. As such, it ensures common electrical waste – such as household items, medical devices, semiconductors, etc. – are disposed of safely to minimise the impact on the environment.
By using these types of labels in conjunction, a business can signpost environmentally hazardous chemical products and use the labels to ensure electrical waste is properly disposed of.
Buy Environmental Labels From Label Source Today
Discover our environmental label stock from Label Source. We have a range of labels available to suit you and your business needs.

.jpg)